Creating A Gold Vintage Patina

I have a thing for patina. So, creating a gold vintage patina was just my thing. Chippy. Worn. Weathered. I love it all. Especially when it comes on a vintage frame. A frame that has good details.
In the Rough – A Before

This one was shabby and rough. Dark and quite dingy. Maybe not covered in a loved patina. More of a dirty-grimy patina. This one came with shabby darkened paint, deep detailed carvings and delightful curves… How I love them. So, when I find them, they seem to find their way home with me. It was covered in years of dirt and grime. Forgotten in an old shed. Underneath that crust of grime; I found an absolutely delightful forgotten antique piece. A gorgeous chunky frame. Given to me by a friend who was going to take it to the thrift store.
Although, I could see through this dark exterior that it has great details. Something was telling me that it needed cleaned and to hold a mirror. I could see that it held a hidden potential with patina. The thing about patina is that not everyone loves its appearance. To some others, well-worn might say damaged or junk, when to others it says absolute treasure. This little treasure has a ton of character and charm. The gesso detailing is a little crumbled in areas. I love all the delicate, old, crumbly gesso… some needed glued.
Beneath the Rough Exterior
- A cleaning – Using oven cleaner I sprayed a thick layer of oven cleaner on the frame, front and back, and let it sit in the sun for at least twenty minutes. Then using a sprayer on the end of my hose I sprayed water on the frame to take off the grime. Some spots required a scrub brush to remove a greasy grime. Yes, I held my breath for fear of removing the beautiful carved detailing. Much to my surprise I didn’t remove much other than a small area of gesso that I reglued when the frame was dry.
- I let it dry in the sun.

The Golden Age
To create that golden patina… I added –
- Gold Paint – a layer of metallic gold craft paint was lightly dry brushed on. Not every nook and cranny, just a layer of gold over the raised carvings and areas to highlight its simply beautiful flowers and detailing. I simply brushed it on lightly and repeated the process until satisfied. I created my own patina so to speak – creating a gold vintage patina. I have since thought of adding a bit of antiquing wax but love it just as it is.
- The wood section of the frame has been left raw to show the grain and perfect color.
- The mirror – Last but not least, a new mirror was added by professionals.

The dry brushed gold paint highlights and lets the details in the molding and the chunky gesso speak volumes of charm all by themselves. Creating a beautiful gold vintage patina adds to the mood of the frame and mirror. It appears as if it had grown beautifully with age or use.

Mirror, Mirror

A way to use a vintage or favorite frame and give it a new purpose is to add a mirror. An added mirror to an old frame adds drama and character to any home or space. To this old frame I created a gold vintage patina.

For one can of oven cleaner, one small bottle of gold paint ($.99), and a 10″ X 12″ mirror at $23.00… All for less than $30.00, I now have a vintage treasure.

My aim wasn’t to make this look like a new piece. My love for vintage treasures wanted me to keep a somewhat authentic appeal while adding a new dimension to an old frame. This is a true repurposing – A true Rustic and Refound! The new mirror does add a bit of polish, and I’m okay with that. An old frame + a new mirror = a piece of art.
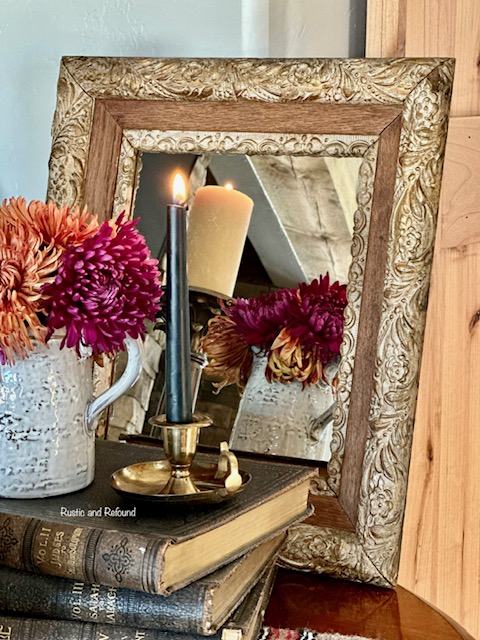
A diamond in the rough. Pretty as a picture. I think creating a gold vintage patina was just my thing!


I hope you enjoyed my adventure creating a gold vintage patina – something that just fits my salvage style.
Happy Wednesday!
